The Story Behind This Recipe
I’ve spent my whole life straddling that line between breakfast food and everything else. Growing up in Memphis, my grandfather would wake up at 4 AM to start the smoker, and by the time I stumbled into the kitchen rubbing my eyes, the whole house smelled like hickory and rendered fat. He’d fry up hash browns in whatever drippings were left in the cast iron from the night before, and I’d eat them standing at the counter before the sun came up. Hash browns were never a side dish in our house — they were the foundation.
The pizza angle came from a late night at the smokehouse about five years back. We’d closed up, the staff was breaking down, and somebody ordered delivery pizza that showed up cold. I had a sheet pan of leftover hash browns from brunch service and a thought: what if I treated the hash brown like a crust? I loaded it up with mozzarella, pepperoni, and whatever else we had lying around, threw it under the broiler, and something magical happened. The hash brown base stayed shatteringly crispy on the bottom while the cheese melted into every crevice. The pepperoni cups filled with rendered fat and got crispy at the edges. I drizzled some of the hot honey we use on our smoked wings and — I’m not exaggerating — nobody spoke for a full minute. Just the sound of chewing.
That late-night experiment became our most requested brunch item. People drive forty-five minutes on a Saturday morning just for these. The secret is pressing the hash browns thin so they get that lacey, golden crunch, and using cupped pepperoni that creates little pools of spicy, rendered goodness on top. The hot honey ties it all together — that sweet heat hitting the salty cheese and smoky pepperoni is a combination that short-circuits your brain in the best possible way.
Before You Start
- Squeeze out every drop of moisture. Grated potatoes are full of starch water. If you skip this step, you’ll get soggy steamed potatoes instead of crispy hash browns. Use a clean kitchen towel or cheesecloth and wring them out until nothing drips.
- Use a 12-inch oven-safe skillet. Cast iron is ideal — it retains heat evenly and gives you the crispiest base. If you don’t have one, a stainless steel pan works, but avoid non-stick for this recipe since you’ll be using the broiler.
- Make the hot honey first. It takes 5 minutes and needs time to cool slightly so the flavors meld. You can also make it a day ahead and store it in a jar at room temperature.
- Cupped pepperoni is non-negotiable. Regular flat pepperoni will work in a pinch, but cupped pepperoni (sometimes labeled “cup and char” or “natural casing”) is what curls up into little crispy bowls that catch rendered fat and cheese. It’s worth seeking out.
- Position your oven rack 6 inches from the broiler. You’ll need the broiler for the final melt-and-crisp step, and too close will burn the pepperoni before the cheese melts properly.
Instructions
Step 1: Make the Hot Honey
Combine honey, hot sauce, and red pepper flakes in a small saucepan over low heat. Warm gently for 3-4 minutes, stirring occasionally, until the mixture is thin and fragrant. Do not boil — you just want it warm enough to dissolve the flavors together. Remove from heat and set aside. The honey will thicken slightly as it cools and the heat will bloom over time.
Step 2: Prepare the Potatoes
Peel the russet potatoes and grate them on the large holes of a box grater. Transfer the grated potatoes to a large bowl of cold water and swish them around to release excess starch — the water will turn cloudy. Drain and transfer the potatoes to a clean kitchen towel. Roll up the towel and squeeze firmly over the sink, wringing out as much liquid as possible. You’ll be surprised how much comes out. Repeat until the potatoes feel dry and slightly sticky.
Transfer the squeezed potatoes to a dry bowl. Add melted butter, garlic powder, smoked paprika, kosher salt, black pepper, and dried oregano. Toss with your hands until everything is evenly coated.
Step 3: Crisp the Hash Brown Base
Preheat your oven to 425F (220C). Set a 12-inch cast iron skillet over medium-high heat and add olive oil. When the oil shimmers, spread the seasoned potatoes evenly across the bottom of the skillet, pressing them down firmly with a spatula into a thin, compact layer — about 1/4 inch thick. You want maximum contact with the hot surface.
Cook without disturbing for 5-6 minutes until the bottom is deeply golden and crispy. You should hear a steady sizzle — if it goes quiet, your heat is too low. Transfer the skillet to the preheated oven and bake for 10-12 minutes until the top of the hash brown is dry and the edges are starting to turn golden brown.
Step 4: Load It Up
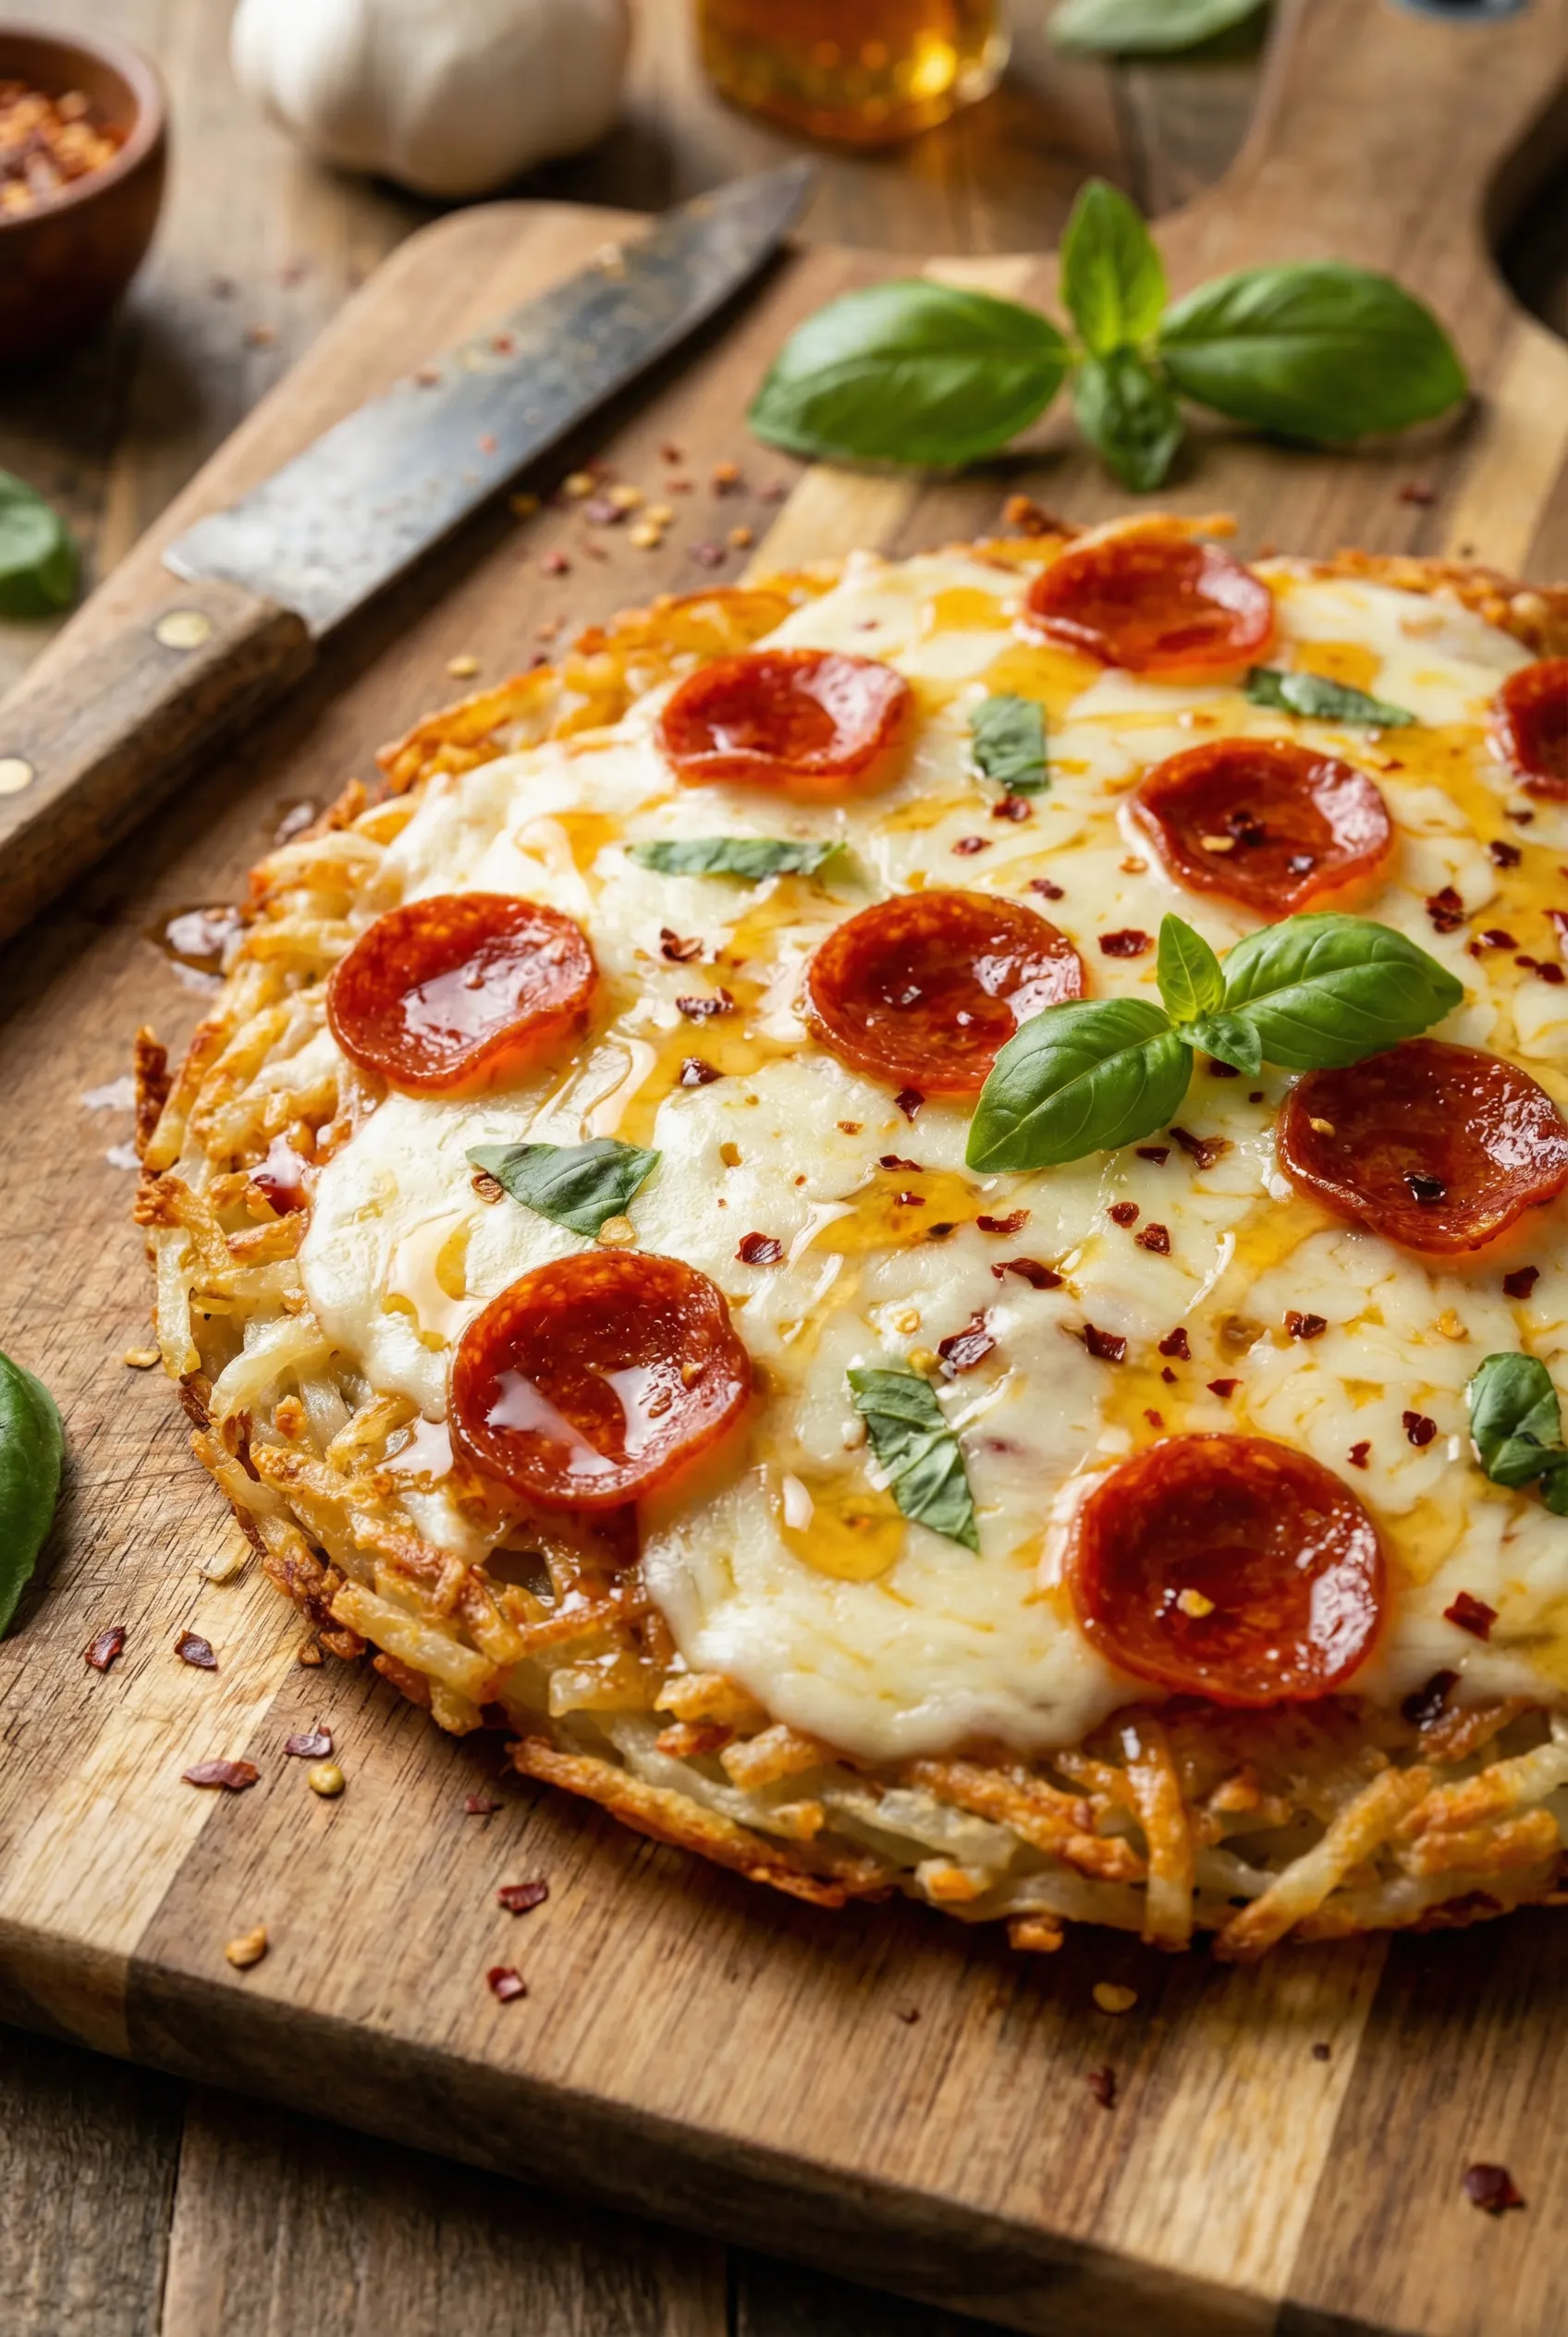
Remove the skillet from the oven and switch the broiler to high. Spread Parmesan cheese evenly over the hash brown base, then layer on the shredded mozzarella. Arrange cupped pepperoni slices over the cheese in a single layer, leaving small gaps so the cheese can bubble through.
Step 5: Broil to Perfection
Place the skillet under the broiler for 3-4 minutes, watching carefully. The cheese should be bubbling aggressively, turning golden in spots, and the pepperoni should curl into crispy cups with rendered fat pooling in their centers. The edges of the hash brown will darken and get extra crunchy — that’s exactly what you want. Do not walk away from the broiler — the difference between perfect and burnt is about 30 seconds.
Step 6: Finish and Serve
Remove the skillet from the broiler and immediately drizzle the hot honey generously over the top in a back-and-forth motion. Scatter fresh basil leaves over everything. Let it rest for 2-3 minutes so the cheese sets just enough to hold together when you cut it.
Slice into wedges like a pizza and serve with warm pizza sauce on the side for dipping. Eat immediately — the contrast between the crispy base and the molten cheese is fleeting and glorious.
Ingredient Substitutions
| Ingredient | Substitute | Notes |
|---|---|---|
| Russet potatoes | Yukon Gold potatoes | Yukon Golds have less starch and more moisture, so squeeze extra thoroughly. They’ll be slightly creamier inside but won’t get quite as shatteringly crispy. |
| Cupped pepperoni | Regular pepperoni or turkey pepperoni | Regular pepperoni stays flat but still tastes great. Turkey pepperoni is leaner and won’t render as much fat, so the edges stay softer. |
| Mozzarella | Fontina or provolone | Fontina melts beautifully and adds a nutty depth. Provolone has a sharper bite. Both work well but melt differently than mozzarella. |
| Hot honey | Regular honey + cayenne pepper | Mix 1/4 cup honey with 1/4 teaspoon cayenne for a quick substitute. It won’t have the same complexity as hot sauce-infused honey but gets the job done. |
| Fresh basil | Dried Italian seasoning | Sprinkle dried herbs before broiling instead of after. Fresh basil is far superior here, but dried works in a pinch. |
| Pizza sauce | Marinara or crushed San Marzano tomatoes | Any good-quality tomato sauce works for dipping. Season with a pinch of garlic powder and oregano if using plain crushed tomatoes. |
Chef’s Tips
- Press the potatoes thin and flat. The thinner the hash brown layer, the crispier it gets. Think of it as a crust, not a pillow. You want every bite to have that satisfying crunch when you cut through it.
- Don’t skimp on the squeeze. Seriously, the single biggest reason hash browns turn out soggy is excess moisture. After you think you’ve squeezed enough, squeeze once more. The potatoes should feel almost like clay — dry and slightly tacky.
- Render the pepperoni cups separately if you want extra crisp. Lay them on a parchment-lined sheet pan and bake at 400F (205C) for 8-10 minutes before adding them to the hash browns. This pre-renders the fat and guarantees crispy, cupped edges every time.
- Make a double batch of hot honey. It keeps at room temperature for months in a sealed jar and is incredible on fried chicken, roasted vegetables, cornbread, and just about everything else. The heat intensifies over time as the pepper flakes continue to infuse.
- Let it rest before cutting. I know it’s tempting to dive in immediately, but giving it 2-3 minutes lets the cheese set just enough to hold the wedges together. Cut too early and the cheese slides right off.
- Upgrade with an egg. For a full breakfast experience, crack an egg into each quadrant of the skillet before broiling. The whites will set while the yolks stay runny — an instant breakfast pizza that’s hard to beat.
Meal Prep & Storage
- Storage: Leftover hash brown wedges keep in an airtight container in the fridge for up to 3 days. The hash brown base will soften slightly but re-crisps well.
- Reheating: Reheat on a sheet pan in a 400F (205C) oven for 8-10 minutes until the bottom is crispy again and the cheese is re-melted. Avoid the microwave — it turns everything rubbery and steamy.
- Freezing: The prepared hash brown base (before toppings) freezes well for up to 2 months. Freeze flat on a parchment-lined sheet pan, then wrap tightly. Bake from frozen at 425F (220C) for 15-18 minutes, then add toppings and broil.
- Batch cooking: Grate and squeeze the potatoes up to 24 hours ahead and store them in an airtight container in the fridge. The prepped potatoes may oxidize slightly (turn pinkish) but this doesn’t affect flavor or texture.
Pairing Suggestions
- Drink: A cold Bloody Mary with extra celery salt and a pickle spear. The acidity and spice complement the richness of the cheese and pepperoni perfectly. For non-alcoholic, a fresh-squeezed orange juice cuts through the fat beautifully.
- Side: A simple arugula salad with lemon vinaigrette. The peppery greens and bright acid provide a welcome contrast to the heavy, cheesy hash browns.
- Accompaniment: Garlic butter dipping sauce — melt butter with minced garlic, a pinch of Italian seasoning, and a squeeze of lemon. It’s pizza shop energy, at home.
- Wildcard: Pickled banana peppers on top. The tangy, mild heat pairs incredibly well with the hot honey sweetness and adds a crunchy-briny pop to every bite.
Frequently Asked Questions
Can I use frozen hash browns instead of fresh? You can, and it works reasonably well for a shortcut. Use the shredded style (not patties), thaw them completely, and squeeze out as much moisture as possible in a kitchen towel. The texture won’t be quite as crispy as fresh-grated russets because frozen hash browns have been par-cooked, but you’ll still get a solid result. Skip the rinsing step since frozen hash browns have already been processed.
Why cupped pepperoni instead of regular? Cupped pepperoni (also called “cup and char” or “old world” pepperoni) has a natural casing that causes it to curl into little bowls when exposed to high heat. These cups catch rendered fat and melted cheese, creating intensely flavorful, crispy bites. Regular pepperoni lies flat and doesn’t develop the same texture. Look for it at your deli counter or in specialty sections — brands like Hormel and Boar’s Head both make versions.
Is this actually a breakfast dish or more of a snack? Honestly, it’s whatever you want it to be. I serve it at brunch with eggs on top, as a game-day appetizer cut into small wedges, and as a late-night snack straight from the skillet. The beauty of this dish is that it works in every context. Add a fried egg and it’s breakfast. Serve it with pizza sauce and it’s an appetizer. Either way, it disappears fast.
Can I make this in a regular (non-cast iron) pan? You can use any oven-safe skillet, but cast iron gives you the best crust because it retains heat so evenly. If you use stainless steel, you may need an extra minute or two on the stovetop to develop the same level of crispiness on the bottom. Avoid non-stick pans since most aren’t rated for broiler temperatures above 400F (205C).
How do I make my own hot honey from scratch? The quickest method is the one in this recipe — warm honey with hot sauce and pepper flakes. For a more complex version, combine honey with dried chili peppers (like calabrian or Thai chilis) in a small saucepan, warm over low heat for 10 minutes, then let it steep for at least 1 hour before straining. The longer it sits, the spicier it gets. Store in a glass jar at room temperature for up to 6 months.
What if I don’t have a broiler? Crank your oven to its highest setting — usually 500F (260C) — and place the loaded skillet on the top rack. It will take 5-7 minutes instead of the 3-4 under a broiler, and you won’t get quite the same char on the pepperoni, but the cheese will still melt and bubble nicely. Watch it closely regardless.