The Story Behind This Recipe
My love affair with creme brulee began long before I ever set foot in a professional kitchen. I was seven years old, standing on a wooden step stool in my mother’s kitchen in Lyon, watching her tap the back of a spoon against the glassy caramel top of a freshly torched custard. The sharp crack, the way the shards gave way to that trembling, impossibly smooth cream underneath — it was pure magic. She made it look effortless, of course, the way mothers always do. That afternoon, while eating my portion far too slowly because I wanted it to last forever, I decided that making desserts was what I wanted to do with my life.
Years later, when I graduated top of my class at ENSP Yssingeaux — the pastry school nestled in the Auvergne hills where every lesson felt like a sacred ritual — the first dish I made to celebrate was creme brulee. Not a towering entremet or a complicated petit gateau, but this humble custard. My professors might have raised an eyebrow, but I knew the truth they had taught me well: mastery shows most clearly in simplicity. A perfect creme brulee has nowhere to hide. The cream must be luxurious, the vanilla must sing, the custard must set to exactly that trembling, barely-there consistency, and the caramel must shatter under the lightest tap.
After honing my craft at Michelin-starred restaurants across France — from the precision of Parisian pastry kitchens to the sun-drenched simplicity of Provencal desserts — I have made thousands of creme brulees. And I still feel a little thrill every single time I hear that crack. This recipe is the one I have refined over fifteen years. It is deceptively simple, deeply satisfying, and I believe every dessert should look like a celebration and taste like a warm hug. This one does both.
Before You Start
- Use the freshest eggs you can find. The yolks are the star here, and fresh yolks have a richer color and more body that translates directly into the custard’s flavor and texture.
- Invest in real vanilla. A whole vanilla bean makes a noticeable difference — those tiny black specks are not just beautiful, they carry a complex floral aroma that extract alone cannot match. If using extract, choose pure, never imitation.
- Bring your dairy and eggs to room temperature. Cold ingredients require more whisking, which introduces air bubbles — the enemy of a smooth custard surface.
- Have your water bath ready. Set up your roasting pan and boil a full kettle before you start assembling. Pouring hot water into the bath while it is already in the oven is much safer than carrying a heavy pan of water across the kitchen.
- Prepare your ramekins. Use six 6-ounce (180 ml) shallow ramekins. Wider, shallower ramekins yield a better custard-to-caramel ratio than deep, narrow ones.
Instructions
Step 1: Infuse the Cream
Pour the heavy cream and whole milk into a medium saucepan. Split the vanilla bean lengthwise with a sharp paring knife and use the back of the knife to scrape out the seeds. Add both the seeds and the scraped pod to the cream. Set the pan over medium heat and warm the mixture until it just begins to simmer — you will see tiny bubbles forming around the edges and steam rising from the surface. Do not let it boil. This should take about 4-5 minutes. Remove from heat, cover, and let the vanilla steep for 15 minutes. This infusion step is essential — it allows the vanilla’s full spectrum of flavor to bloom into the cream. If using vanilla extract instead, skip the steeping and stir the extract into the warm cream.
Step 2: Prepare the Egg Yolks
While the cream infuses, preheat your oven to 325F (165C). In a large mixing bowl, whisk the 5 egg yolks, 1/2 cup granulated sugar, and the pinch of sea salt together. Whisk gently but thoroughly for about 1-2 minutes until the mixture is pale yellow and slightly thickened. The key word here is gently — vigorous whisking creates foam and air bubbles that will mar the surface of your custard. You want a smooth, ribbon-like consistency where the whisk leaves a faint trail.
Step 3: Temper the Eggs
Remove the vanilla pod from the infused cream (rinse it, dry it, and save it — you can bury it in a jar of sugar to make vanilla sugar). Slowly pour the warm cream into the egg mixture in a thin, steady stream while whisking constantly. Pour no more than a quarter of the cream at first, whisking the entire time. This gradual introduction — called tempering — raises the temperature of the yolks gently so they do not scramble. Once the first addition is fully incorporated, you can add the remaining cream more quickly while continuing to whisk.
Step 4: Strain and Pour
Set a fine-mesh sieve over a large liquid measuring cup or bowl with a pour spout. Strain the custard through the sieve, pressing gently with a spatula. This catches any bits of cooked egg, vanilla pod fibers, or chalazae, ensuring an absolutely silky result. Skim any foam or bubbles from the surface with a spoon — take your time here, as every bubble you remove now is one less imperfection on your finished custard. Divide the custard evenly among the six ramekins.
Step 5: Set Up the Water Bath
Place the ramekins in a deep roasting pan or large baking dish, spacing them evenly so they do not touch. Pull the oven rack out halfway and place the pan on the rack. Carefully pour hot water (just off the boil) into the roasting pan until it reaches halfway up the sides of the ramekins — typically about 1 inch (2.5 cm) of water. The water bath, or bain-marie, insulates the custard from the direct heat of the oven, ensuring gentle, even cooking that prevents curdling and cracking.
Step 6: Bake the Custards
Slide the rack gently into the oven and bake for 40-50 minutes. Begin checking at the 40-minute mark. The custards are done when the edges are set but the center still has a gentle wobble — imagine the consistency of barely-set gelatin when you give the ramekin a light shake. The center should jiggle in a circle about 2 inches (5 cm) in diameter. If the entire surface is firm, they are overbaked. The internal temperature at the center should read between 170-175F (77-80C). They will firm up significantly as they cool.
Step 7: Cool and Chill
Carefully remove the ramekins from the water bath using tongs or a folded kitchen towel. Place them on a wire rack and let them cool at room temperature for 30 minutes. Then cover each ramekin with plastic wrap (press the wrap gently against the surface to prevent condensation from dripping onto the custard) and refrigerate for at least 4 hours, or ideally overnight. The custard needs this time to fully set and develop its flavor. You can refrigerate for up to 3 days before torching.
Step 8: Torch the Sugar
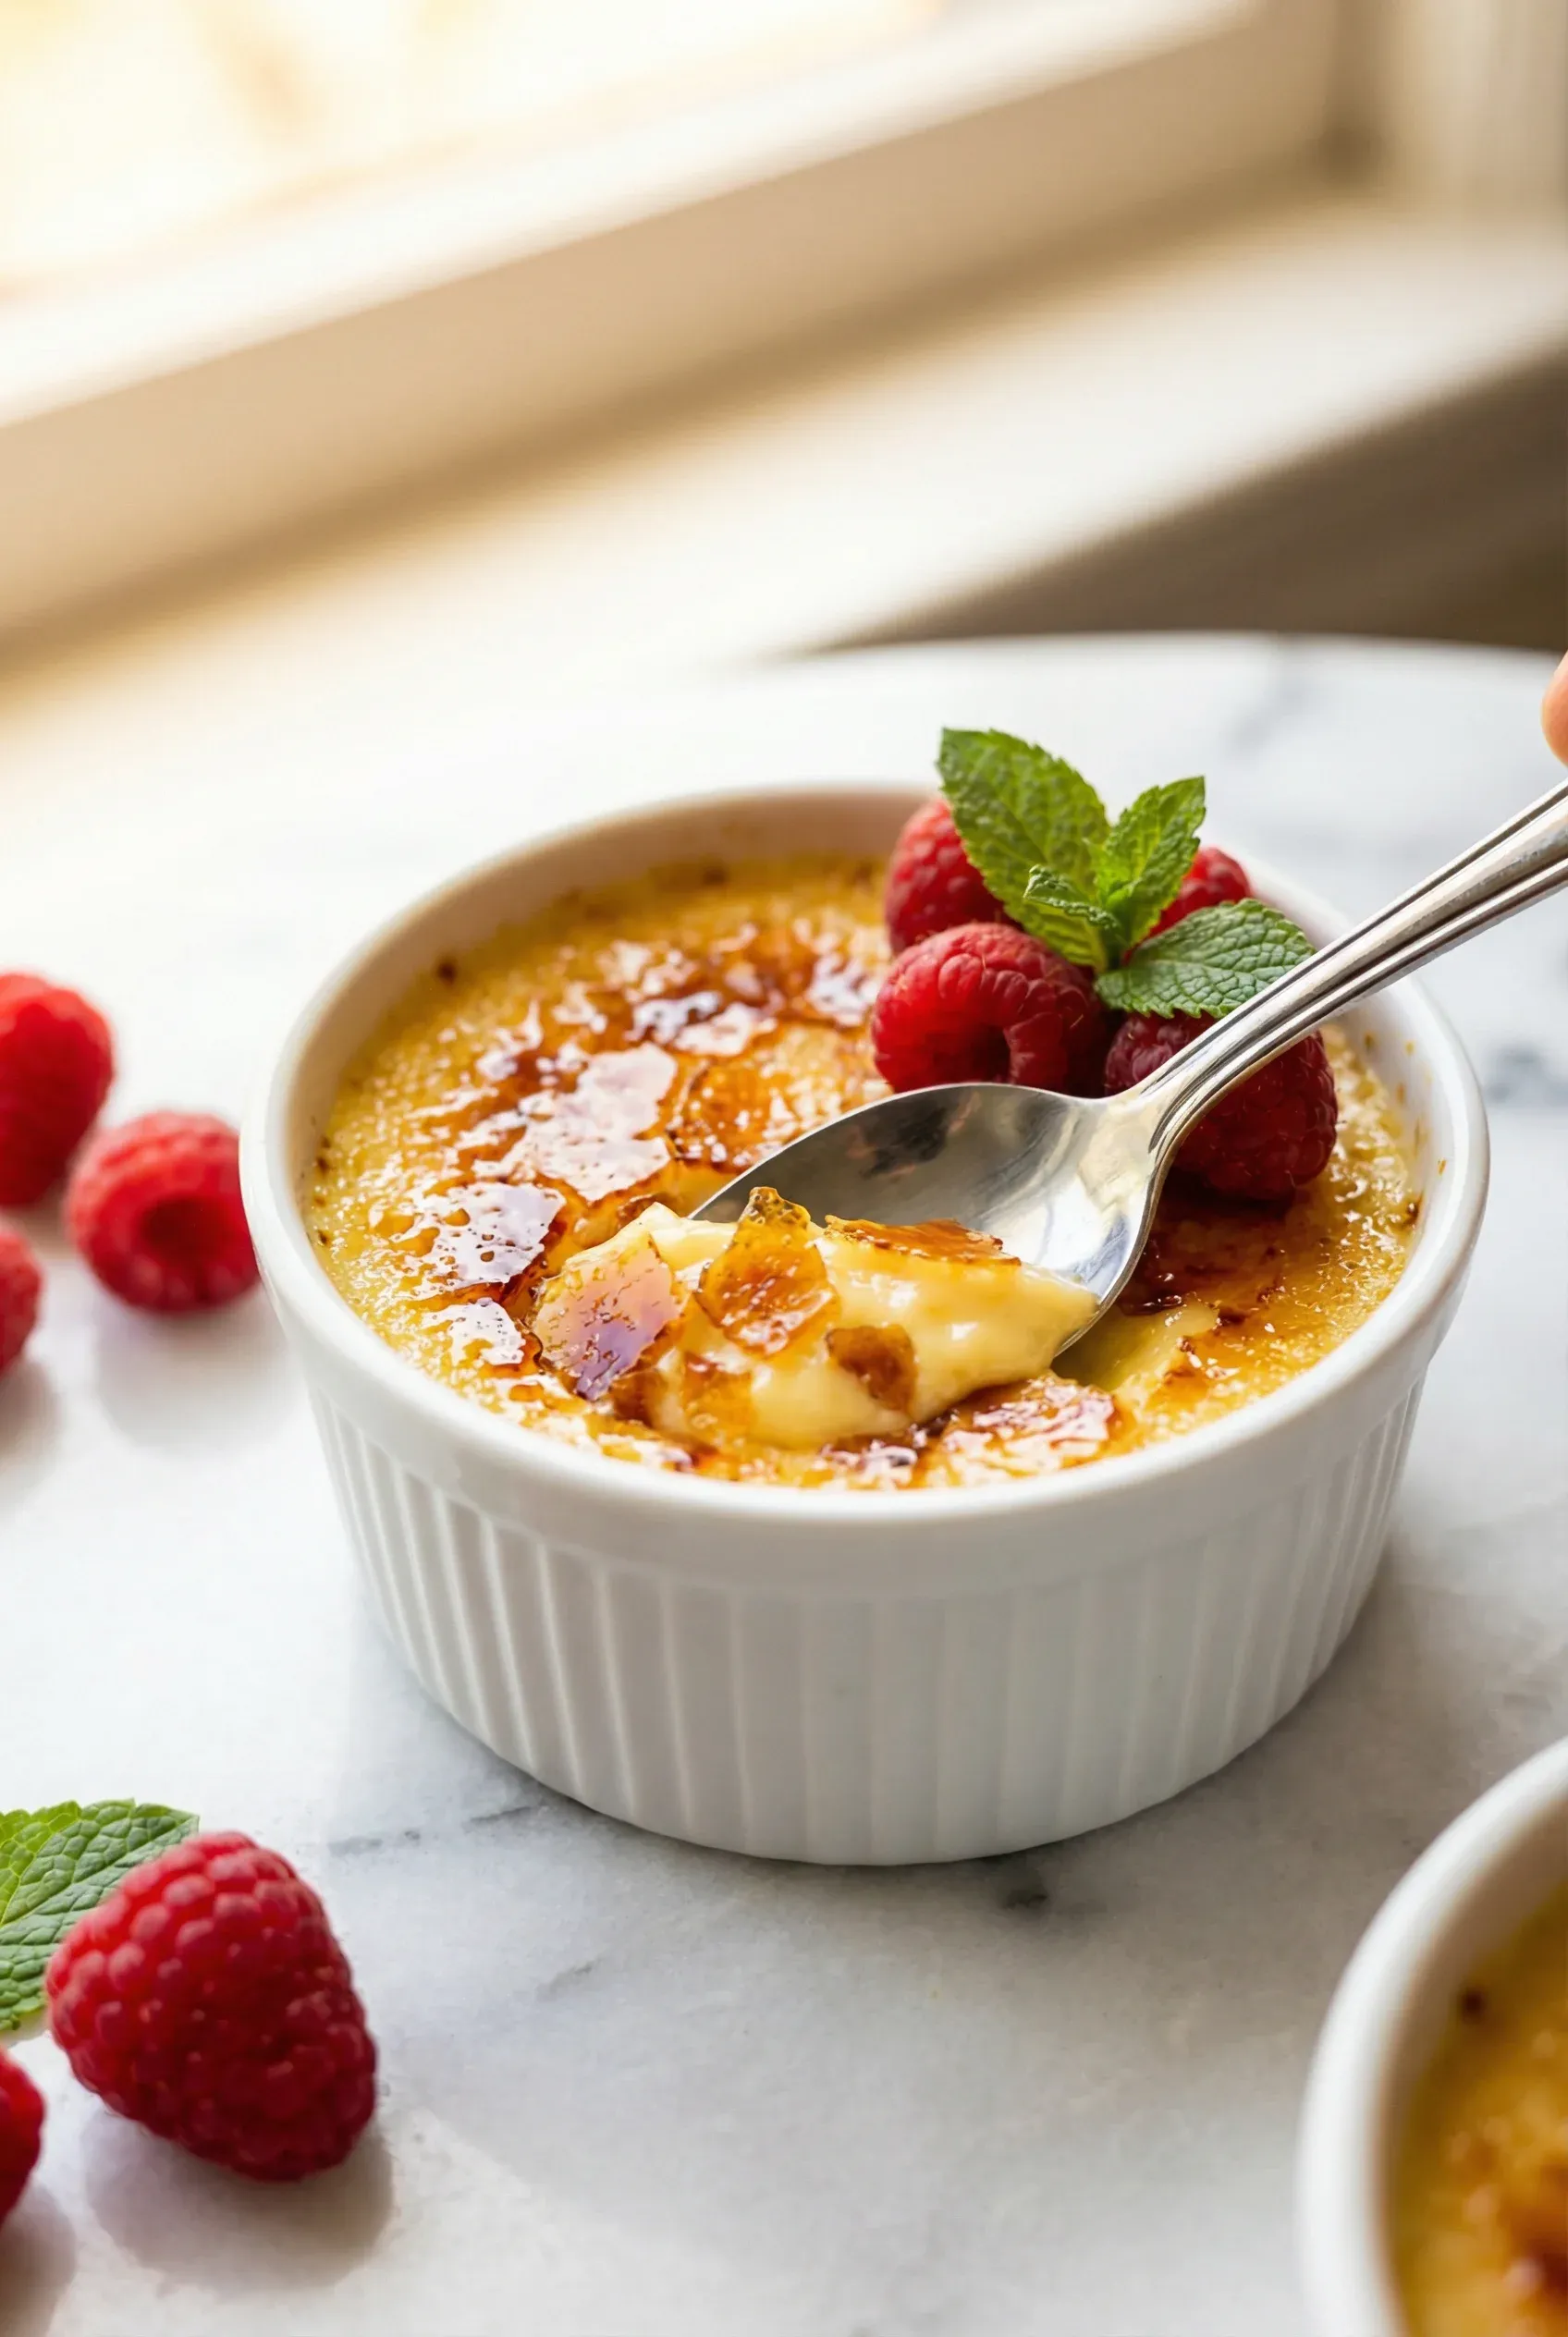
Remove the ramekins from the refrigerator 30 minutes before serving — a slightly tempered custard contrasts better with the warm caramel. Blot any moisture from the surface with a paper towel. Sprinkle 1 tablespoon of granulated sugar evenly over each custard. Tilt and rotate the ramekin to distribute the sugar in a thin, uniform layer — clumps will burn while thin spots stay pale.
Hold a kitchen torch about 3-4 inches (8-10 cm) from the surface and ignite. Move the flame in slow, continuous circles. The sugar will first melt, then bubble, then turn from pale gold to amber to deep caramel. This takes about 45-90 seconds per ramekin. Stop when the surface is an even golden-amber — it will continue to darken slightly from residual heat. Let the caramel harden for 1-2 minutes before serving. The sugar crust should be glassy and shatter crisply when tapped with a spoon.
Ingredient Substitutions
| Ingredient | Substitute | Notes |
|---|---|---|
| Heavy cream | Half-and-half (3 cups total, omit milk) | Lighter texture, slightly less rich. Still sets properly. |
| Whole milk | Additional heavy cream | Richer, denser custard. Reduce baking time by 5 minutes. |
| Vanilla bean | 2 tsp vanilla bean paste or pure vanilla extract | Bean paste preserves the flecked appearance. Extract is more affordable. |
| Granulated sugar (custard) | Light brown sugar | Adds a subtle caramel-butterscotch depth to the custard base. |
| Granulated sugar (topping) | Demerara or turbinado sugar | Coarser crystals create a thicker, crunchier caramel crust. |
| Egg yolks | No direct substitute | Yolks are essential for structure and richness. Do not use whole eggs. |
| Heavy cream (dairy-free) | Full-fat coconut cream | Different flavor profile but sets well. Chill the coconut cream overnight. |
Chef’s Tips
- Choose the right ramekins. Wide, shallow ramekins (about 1 inch / 2.5 cm deep) give you the ideal ratio of crackling caramel to creamy custard. Deep ramekins mean too much custard and not enough of that glorious crust.
- Do not skip the straining step. This single step is the difference between a merely good custard and a flawless one. Even if your mixture looks perfectly smooth, strain it anyway — it catches microscopic bits you cannot see.
- Control your torch distance. Too close and you will scorch the sugar into bitter black patches. Too far and it will not caramelize evenly. The sweet spot is 3-4 inches, with constant circular motion.
- For a broiler alternative: If you do not own a kitchen torch, place ramekins on a sheet pan and broil on the top rack at 550F (290C) for 1-2 minutes, watching constantly. Rotate the pan halfway through for even browning.
- Flavor variations are endless. Once you master the base recipe, try infusing the cream with espresso beans, lavender, citrus zest, cardamom, or even earl grey tea. Add the flavoring during the steeping step and strain it out.
- Test with the “tap and listen” method. A properly set custard produces a faint, dull sound when you tap the side of the ramekin. An undercooked custard sounds more liquid and sloshy.
Meal Prep & Storage
- Make-ahead custard: The unbaked custard base can be prepared, strained, and poured into ramekins up to 24 hours in advance. Cover tightly with plastic wrap and refrigerate until ready to bake.
- Refrigerator storage: Baked and chilled custards (without the sugar topping) keep beautifully for up to 3 days in the refrigerator, covered with plastic wrap. This makes creme brulee an ideal dinner party dessert — do all the work days ahead and torch at the last minute.
- Torch only before serving: The caramelized sugar crust begins to soften after about 1-2 hours as it absorbs moisture from the custard below. Always torch just before you plan to serve for that perfect shattering crack.
- Freezing is not recommended: The custard’s delicate texture does not survive freezing and thawing well. It tends to become grainy and weep liquid. If you must freeze, expect a noticeable decline in quality.
- Leftover egg whites: You will have 5 egg whites left over. Store them in an airtight container in the refrigerator for up to 4 days or freeze for up to 3 months. Use them for meringues, financiers, macarons, or add them to morning scrambles.
Pairing Suggestions
- Wine: A glass of Sauternes or late-harvest Riesling mirrors the custard’s richness with honeyed sweetness and bright acidity. For something sparkling, a demi-sec Champagne or Moscato d’Asti is lovely.
- Coffee: A strong, short espresso or a French press coffee cuts through the richness beautifully. The slight bitterness provides perfect contrast to the sweet caramel and vanilla cream.
- Fruit: A small pile of fresh raspberries, a few slices of ripe fig, or a scatter of passion fruit seeds on the plate beside the ramekin adds color and a tart counterpoint.
- Cookies: Thin, crisp tuile cookies or delicate langues de chat served alongside give your guests something to scoop the custard with after the crust is broken — an indulgent bonus.
Frequently Asked Questions
Why did my custard curdle or have a rubbery texture? This almost always means the oven was too hot or the custards baked too long. Creme brulee must bake gently at 325F (165C) in a water bath. Without the water bath, the direct heat causes the eggs to overcook around the edges while the center stays raw. Always check at the 40-minute mark and look for that telltale wobble in the center.
Can I make creme brulee without a kitchen torch? Yes. Place the sugar-topped ramekins under a very hot broiler set to 550F (290C) for 1-2 minutes, watching them like a hawk. The results are slightly less even than a torch, but perfectly acceptable. You can also heat the back of a metal spoon over a gas burner until glowing and press it against the sugar to caramelize in sections.
Why is there liquid on top of my chilled custard? A thin layer of moisture on the surface is called weeping and is usually caused by overbaking or cooling too quickly. It can also happen if the plastic wrap does not sit close enough to the surface during refrigeration, allowing condensation to drip down. Blot gently with a paper towel before adding the sugar topping.
How far in advance can I make creme brulee? The custard base improves with time in the refrigerator — the flavors meld and the texture becomes even silkier. You can bake the custards up to 3 days ahead and store them covered in the fridge. Torch the sugar topping no more than 1-2 hours before serving, though just before serving is ideal.
Can I use whole eggs instead of just yolks? I strongly advise against it. Whole eggs contain the whites, which set firmly and give a bouncier, almost flan-like texture. Traditional creme brulee relies exclusively on yolks for that luxuriously smooth, melt-in-your-mouth consistency. The fat in the yolks is what creates the velvety richness that defines this dessert.
What sugar works best for the caramelized topping? Regular white granulated sugar is the classic choice and produces the thinnest, most evenly caramelized crust. Superfine (caster) sugar melts even more quickly and gives an ultra-thin, delicate layer. Demerara or turbinado sugar creates a thicker, crunchier crust with more textural drama. Avoid powdered sugar — it contains cornstarch and will not caramelize properly.