The Story Behind This Recipe
There’s a moment in every pitmaster’s life when he realizes that not everything has to take twelve hours. Mine happened on a Tuesday night after a sixteen-hour brisket session at the smokehouse. I was dead tired, standing in my home kitchen at 9 PM with nothing prepped, staring into the fridge at a package of chicken thighs I’d bought three days earlier. I didn’t have the energy for anything fancy. What I had was honey, soy sauce, garlic, and a jar of gochugaru my buddy brought back from a trip to Seoul.
I grew up in Memphis, Tennessee, learning low-and-slow from my grandfather — the kind of cooking where patience is the primary ingredient. But my three-time championship BBQ career also taught me something else: great food is about getting the fundamentals right, not about complexity. A beautiful sear. A balanced glaze. Knowing when to leave things alone. So I dried off those chicken thighs, cranked a cast iron skillet to ripping hot, and let the skin do what skin does when it meets screaming hot oil — it crackled, it blistered, it turned into something that sounded like applause when I bit into it. While the chicken rested, I threw together a quick pan sauce: honey for sweetness, soy for salt, gochugaru for that slow-building Korean heat, garlic, ginger, and a knob of butter to bring it all together into a glossy, sticky glaze that clung to every ridge and crevice of that crispy skin.
That Tuesday night dinner has become the most requested recipe at my house. My kids ask for it more than my competition ribs — which, if you know me, is both flattering and slightly offensive. The sweet-heat trend that’s taken over food right now isn’t new to anyone who’s been glazing ribs with hot honey for years, but this chicken version is faster, easier, and — I’ll say it — just as satisfying. It’s weeknight cooking with weekend flavor, and that’s the kind of food I believe in.
Before You Start
- Dry the chicken skin completely. This is the single most important step for crispy skin. Pat each thigh dry with paper towels on both sides — press firmly and use multiple towels if needed. Surface moisture is the enemy of crispiness.
- Bring the chicken to room temperature. Pull the thighs from the fridge 20-30 minutes before cooking. Cold chicken in a hot pan will lower the oil temperature and cause the skin to steam instead of sear.
- Use a heavy skillet. A 12-inch cast iron skillet is ideal. It retains heat evenly and won’t drop in temperature when you add the chicken. A stainless steel pan works too — avoid non-stick, which can’t handle the high heat you need.
- Make the sauce while the chicken cooks. Don’t prep the sauce ahead — it takes only 3 minutes and should be freshly made so the honey stays fluid and glossy.
- Have your garnishes sliced and ready. Once the glaze goes on, you need to plate immediately while everything is hot and sticky.
Instructions
Step 1: Season the Chicken
Pat the bone-in, skin-on chicken thighs thoroughly dry with paper towels — both sides, paying extra attention to the skin side. Season generously on all sides with kosher salt, black pepper, and garlic powder. The seasoning should be visible on the surface — don’t be shy. If you have time, season the thighs and let them sit uncovered on a wire rack in the fridge for 1-2 hours (or even overnight). This dry-brine technique pulls moisture from the skin and concentrates the seasoning, resulting in dramatically crispier skin.
Step 2: Sear Skin-Side Down
Set a 12-inch cast iron skillet over medium-high heat and add vegetable oil. Let the oil heat until it shimmers and you see the first faint wisps of smoke — about 375-400°F (190-200°C). Place the chicken thighs skin-side down in the skillet, pressing each one flat against the surface with a spatula for the first 10 seconds to ensure maximum contact. You should hear an immediate, aggressive sizzle. If you don’t, your pan isn’t hot enough — remove the chicken and wait.
Cook skin-side down for 8-10 minutes without moving them. Do not flip, do not peek, do not press. The fat will render slowly from under the skin, essentially deep-frying it from below. You’ll hear the sizzle intensify and then mellow as the moisture cooks out. Resist the urge to move them. When ready, the skin will release easily from the pan — if it sticks, it needs more time.
Step 3: Flip and Finish
Flip the thighs to skin-side up. The skin should be deep golden brown and visibly crispy — shatteringly so, with textured ridges and bubbled surface. If it’s pale or soft, flip it back down for another 2-3 minutes. Once flipped, reduce the heat to medium and continue cooking for 12-15 minutes until the internal temperature reads 165°F (74°C) at the thickest part of the thigh. The juices should run clear when pierced with a knife.
Transfer the chicken thighs to a wire rack set over a sheet pan — never directly onto a plate or paper towels, which will trap steam and soften the crispy skin. Let them rest for 5 minutes.
Step 4: Build the Chili Honey Glaze
While the chicken rests, drain all but a thin layer of rendered fat from the skillet (save the rest — chicken fat is liquid gold for cooking). Return the skillet to medium heat. Add minced garlic and grated ginger and cook for 30-45 seconds, stirring constantly until fragrant but not browned — the aroma should shift from sharp and raw to sweet and toasty.
Add honey, soy sauce, rice vinegar, gochugaru, and red pepper flakes. Stir everything together and let the sauce simmer for 2-3 minutes until it thickens slightly and becomes glossy — it should coat the back of a spoon. Remove from heat and stir in unsalted butter and toasted sesame oil. The butter adds body and shine; the sesame oil adds a nutty finish. The sauce should be thick, sticky, and deeply aromatic — sweet, salty, spicy, and just barely tangy from the vinegar.
Step 5: Glaze the Chicken
Return the rested chicken thighs to the skillet, skin-side up. Using a spoon, baste the glaze generously over the top of each thigh, letting it pool around the edges and drip down the sides. Spoon the glaze over the skin 3-4 times, tilting the pan to collect the sauce. You want the skin coated but not submerged — the goal is a lacquered finish, not a drowning. The glaze should cling to the crispy ridges of the skin, creating pockets of sticky sweetness.
Step 6: Garnish and Serve
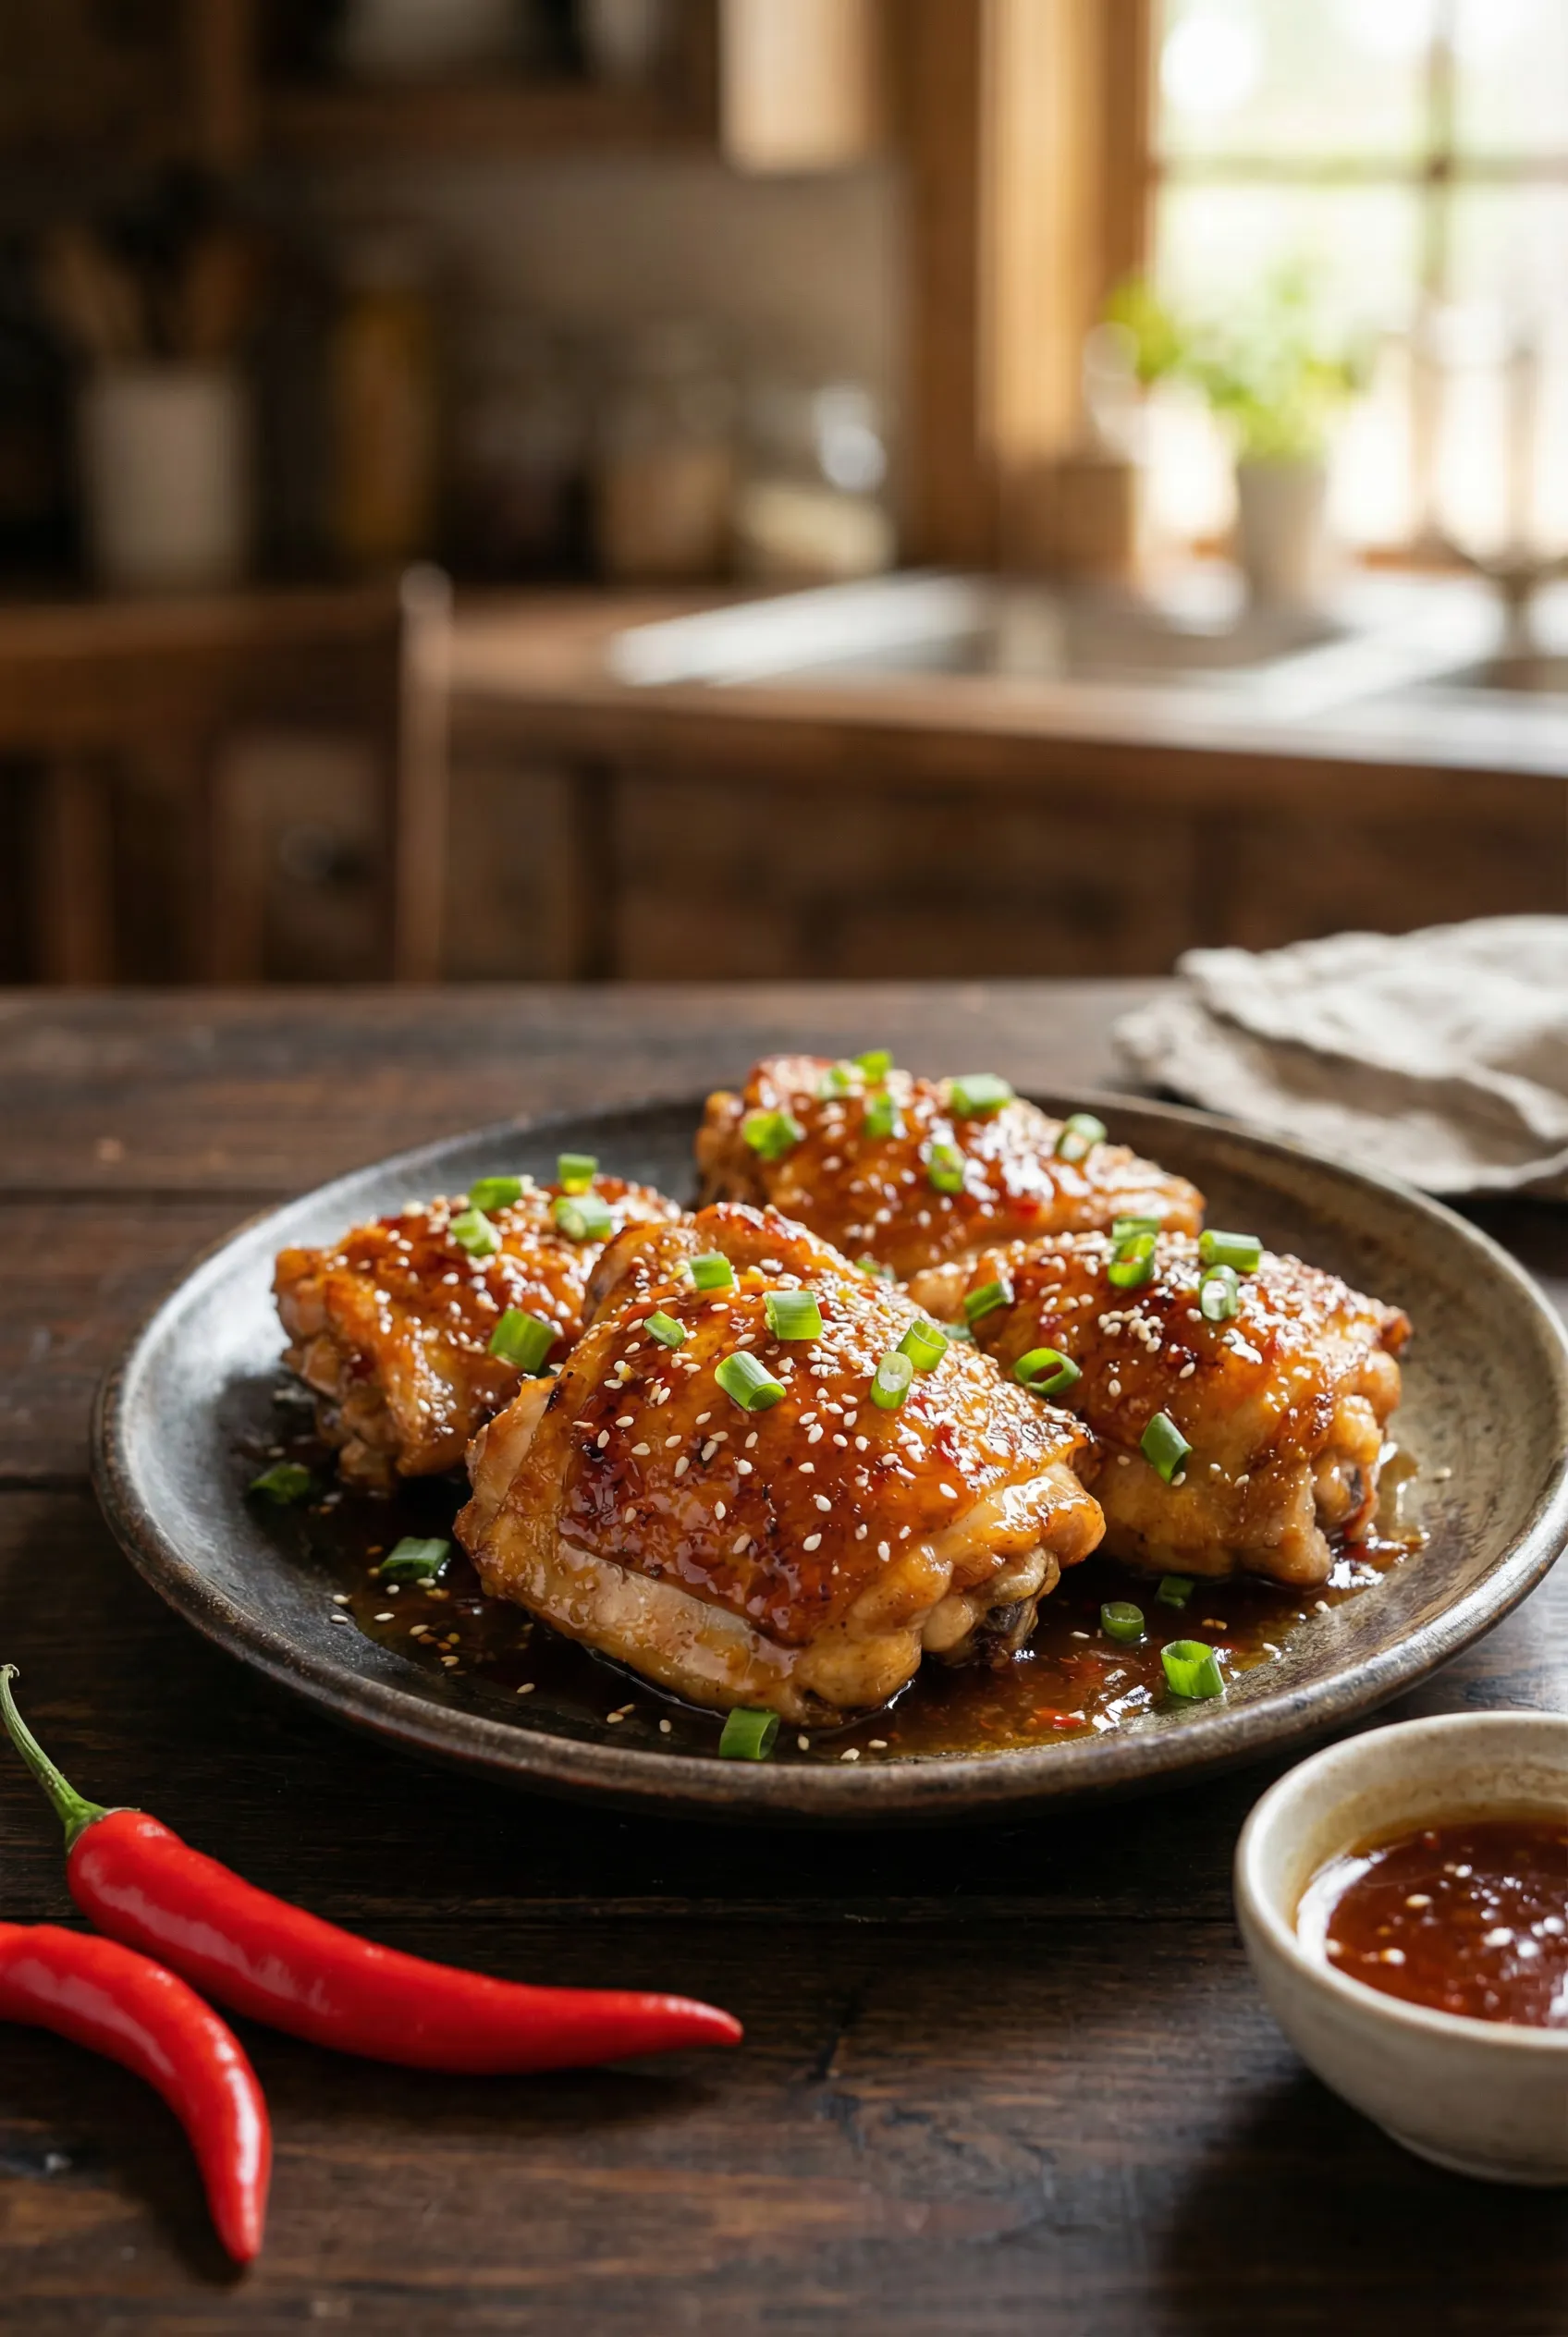
Transfer the glazed chicken thighs to a serving platter. Spoon any remaining sauce from the pan over the top. Scatter toasted sesame seeds, sliced green onions, and thinly sliced Fresno chili over the chicken. The green of the scallions, the white of the sesame seeds, and the red of the chili against the amber glaze makes this dish look as spectacular as it tastes. Serve immediately while the skin is still crackling and the glaze is warm and fluid.
Ingredient Substitutions
| Ingredient | Substitute | Notes |
|---|---|---|
| Bone-in chicken thighs | Boneless skin-on thighs or drumsticks | Boneless cooks 5-7 minutes faster. Drumsticks need an extra 5 minutes. Keep the skin — it’s essential. |
| Gochugaru | Aleppo pepper or mild paprika + pinch of cayenne | Gochugaru has a fruity, moderate heat. Aleppo is the closest match. Standard chili powder is too earthy. |
| Honey | Hot honey (Mike’s Hot Honey) or maple syrup | Hot honey doubles down on the heat. Maple adds a deeper, more autumnal sweetness. |
| Rice vinegar | Apple cider vinegar | Slightly more assertive tang. Use the same amount. |
| Soy sauce | Tamari or coconut aminos | Tamari for gluten-free. Coconut aminos are sweeter — reduce honey by 1 tablespoon. |
| Fresno chili | Red jalapeño or Thai bird’s eye chili | Fresno is mildly hot. Jalapeño is similar. Thai chili is significantly hotter — use half the amount. |
| Unsalted butter | Ghee or additional sesame oil | Ghee handles the residual heat better. Extra sesame oil shifts the flavor profile toward Asian. |
Chef’s Tips
- The dry-brine changes everything. If you can plan ahead, season the thighs and rest them uncovered on a wire rack in the fridge for 4-24 hours. The salt draws moisture from the skin, and the cold circulating air dries the surface further. The result is skin that crisps twice as fast and shatters like glass. This is the technique I use at my smokehouse for every piece of poultry that crosses the kitchen.
- Don’t crowd the skillet. If your 12-inch pan won’t comfortably hold all 8 thighs with space between them, cook in two batches. Overcrowding drops the pan temperature and traps steam — you’ll get steamed, flabby skin instead of crispy. Better to take an extra 10 minutes than to ruin the sear.
- Render the fat low and slow, then crank the heat. Start the thighs skin-side down over medium-high to get the sear going, but if the skin is browning too fast before the fat renders, lower to medium. You want the fat to melt out gradually — that’s what creates the impossibly crispy, paper-thin texture. Once rendered, the high heat locks in the crunch.
- Save the rendered chicken fat. That golden liquid you drain from the skillet is called schmaltz, and it’s one of the best cooking fats on the planet. Use it to roast potatoes, fry eggs, or make cornbread. It keeps in the fridge for 2 weeks or the freezer for 3 months.
- Double the glaze for meal prep. The chili honey sauce is incredible on almost everything — drizzle it over roasted sweet potatoes, brush it on grilled salmon, or toss it with crispy Brussels sprouts. Make a double batch and store the extra in a jar in the fridge for up to 2 weeks.
- Use a thermometer, not a timer. Every thigh is a slightly different size and thickness. Pull at 165°F (74°C) internal temperature for perfectly juicy, fully cooked dark meat every time.
Meal Prep & Storage
- Refrigerator: Store cooked glazed thighs in an airtight container for up to 4 days. The glaze acts as a flavor-preserving coating that keeps the chicken moist during storage.
- Reheating: Reheat in a 400°F (200°C) oven on a wire rack for 8-10 minutes to re-crisp the skin. The microwave will make the skin rubbery — avoid it. For maximum crispiness, brush a thin layer of fresh glaze on top before reheating.
- Freezing: Fully cooked and glazed thighs freeze well for up to 2 months. Wrap each thigh individually in plastic wrap, then place in a freezer bag. Thaw overnight in the fridge and reheat in the oven as above.
- Batch cooking: Double the recipe and use leftover chicken for meal prep bowls. Slice the thighs over rice with pickled vegetables and a drizzle of extra glaze for quick lunches.
- Glaze separately: The chili honey glaze stores for up to 2 weeks refrigerated in a sealed jar. Reheat gently in a small saucepan or microwave for 15 seconds before drizzling.
Pairing Suggestions
- Rice: Steamed jasmine rice is the obvious choice — its subtle floral sweetness is the perfect canvas for the bold chili honey glaze. Coconut rice takes it to another level.
- Slaw: A crunchy Asian-style slaw with shredded cabbage, carrots, cilantro, and a lime-sesame dressing provides the cool, acidic counterbalance this rich dish needs.
- Drink: An ice-cold IPA or a slightly sweet off-dry Riesling. The bitterness of an IPA cuts through the honey sweetness, while Riesling’s natural acidity and touch of residual sugar harmonize with the chili heat.
- Cornbread: My Memphis roots demand it — a wedge of skillet cornbread with honey butter is the ultimate companion. The sweetness of the cornbread echoes the honey in the glaze, and the crumbly texture soaks up every drop of sauce.
Frequently Asked Questions
Can I make this with boneless, skinless chicken thighs? You can, but you’ll lose the crispy skin component that makes this dish special. If going boneless and skinless, coat the thighs lightly in cornstarch before searing — this creates an artificial crust that holds the glaze well. Reduce the initial sear time to 4-5 minutes per side and the overall cook time by about 8 minutes. Check for 165°F (74°C) internal temperature.
How do I get the skin really crispy? Three factors: dry skin, hot pan, and patience. Pat the skin bone-dry with paper towels (seriously, use 3-4 towels per batch). Get the oil in the skillet shimmering before the chicken goes in. And then — this is the hard part — don’t touch it for a full 8-10 minutes. The fat needs to render slowly to create that paper-thin, shattering crispiness. If you flip too early, the skin tears and never crisps properly.
Is gochugaru the same as gochujang? No — they’re different products. Gochugaru is dried Korean red chili flakes — it’s a dry spice with a fruity, moderately hot flavor. Gochujang is a fermented red chili paste that’s thick, sweet, and funky. This recipe uses gochugaru for its clean heat that integrates into the honey glaze without adding moisture. If you only have gochujang, you can use 2 teaspoons instead, but reduce the honey by 1 teaspoon since gochujang contains sugar.
Can I bake these instead of pan-frying? Yes. Place seasoned thighs skin-side up on a wire rack set over a sheet pan and bake at 425°F (220°C) for 35-40 minutes until the skin is crispy and the internal temperature reaches 165°F (74°C). Make the glaze separately in a saucepan and brush it over the thighs during the last 5 minutes of baking. The skin won’t be quite as crispy as the pan-fried version, but it’s a great hands-off alternative for feeding a crowd.
What if my glaze is too thick or too thin? If the glaze thickens too much and becomes sticky like candy, add 1-2 tablespoons of water and stir over low heat until it loosens. If it’s too thin and runny, simmer for an additional 1-2 minutes until it coats the back of a spoon. The ideal consistency is like warm maple syrup — fluid enough to pour but thick enough to cling to the skin without dripping off immediately.
How spicy is this dish? With the amounts listed, it’s moderately spicy — you’ll feel a pleasant warmth that builds but doesn’t overwhelm. The honey and butter in the glaze tame the heat significantly. For less heat, halve the gochugaru and skip the red pepper flakes entirely. For more fire, add an extra teaspoon of gochugaru and a few dashes of hot sauce to the glaze, or scatter extra sliced Thai chilies on top before serving.