The Story Behind This Recipe
There is a saying in Poland — “Pierogi łączą ludzi” — pierogi bring people together. In my family, this was not a saying. It was a fact. Every Sunday afternoon in our Warsaw apartment, my mother would clear the dining table, dust it with flour, and the whole family would gather to make pierogi. My father rolled the dough. My grandmother prepared the filling. The children — all five of us — were put to work pressing the edges shut with our small fingers. We would make hundreds at a time, enough to feed us through the week and still have extras for the neighbors downstairs.
I have been making pierogi for more than forty years now, and my hands still remember the rhythm before my mind does — scoop, fold, press, crimp. The dough should feel like an earlobe, soft and pliable and slightly warm. The filling should taste like it could stand on its own as a meal, because in Poland, pierogi are not a side dish. They are the centerpiece. My mother used twaróg, a fresh farmer’s cheese that has a crumbly, slightly tangy quality you cannot replicate with anything else. When it melts into hot mashed potatoes with a little butter and white pepper, the filling becomes silky and rich without being heavy.
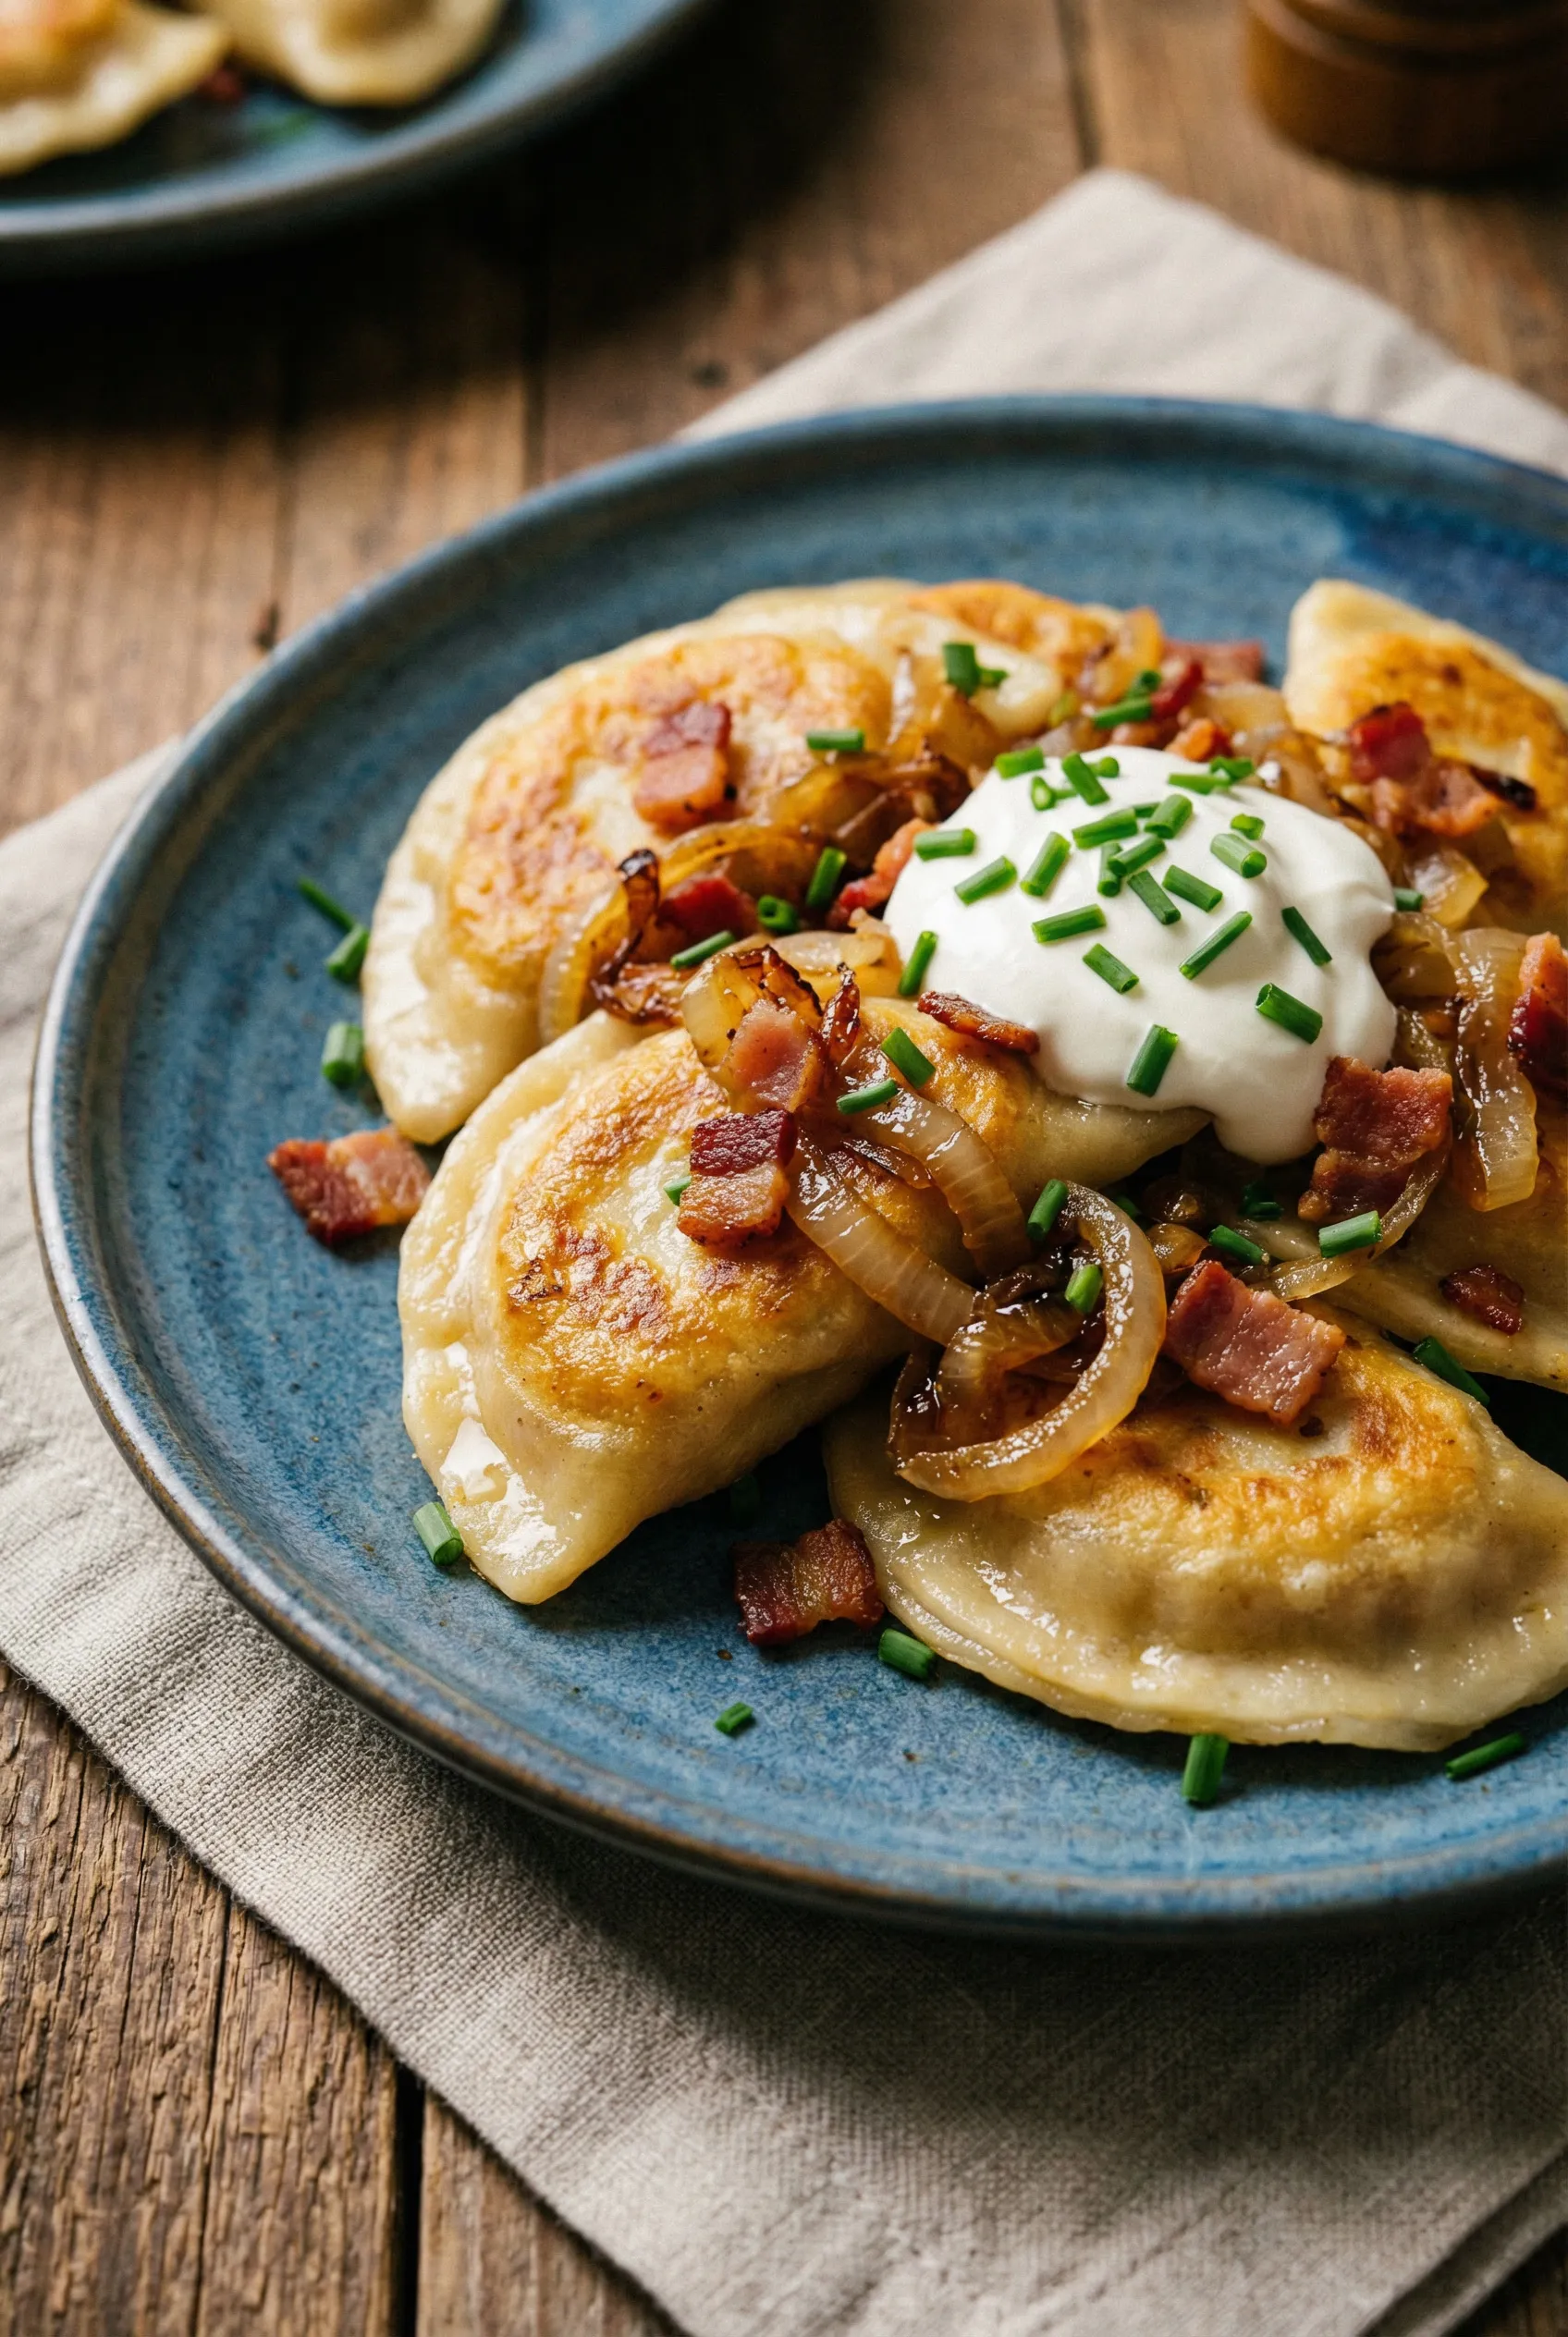
The way I serve them has evolved over the years. When I was raising my own seven children, pierogi were boiled and served simply with sour cream because speed mattered. Now that the house is quiet and I cook for pleasure rather than survival, I take the time to pan-fry them in butter until the edges turn golden and crispy, and I pile them with slowly caramelized onions that have gone deep amber and sweet. A little crispy bacon on top, a generous dollop of sour cream, and a handful of chives — that is my idea of a perfect meal. Every time I make them, I can feel my mother’s hands guiding mine.
Before You Start
- Use warm water for the dough, not hot. The water should be comfortable to touch — around 110F (43C). Too hot and it will cook the egg and make the dough tough. Too cold and the dough won’t come together smoothly.
- Boil the potatoes until they’re falling apart. Undercooked potatoes make lumpy filling. You want them so soft that they practically mash themselves when you press them with a fork. Drain them thoroughly — excess water makes the filling watery and the pierogi will burst during boiling.
- Let the dough rest. This is not optional. The gluten needs at least 30 minutes to relax, or the dough will spring back when you roll it and your pierogi will be thick and chewy instead of thin and tender.
- Work in batches. Keep the dough you’re not using covered with a damp towel or plastic wrap. It dries out quickly, and dry dough cracks and won’t seal properly.
- Set up an assembly station. Have your rolled dough, filling, a small bowl of water, a fork for crimping, and a floured sheet pan for finished pierogi all within arm’s reach. Once you find your rhythm, you can assemble 4-5 per minute.
Instructions
Step 1: Make the Dough
Mound flour on a clean work surface and make a well in the center. Add the egg, warm water, sour cream, vegetable oil, and kosher salt to the well. Using a fork, gradually incorporate the flour from the inner edges of the well into the wet ingredients, working outward in a spiral. When it becomes too stiff for the fork, switch to your hands.
Knead the dough for 8-10 minutes until it is smooth, soft, and slightly tacky — it should feel like a well-kneaded pizza dough. If it sticks to your hands, dust with a tiny amount of flour, but resist the urge to add too much — a wetter dough makes more tender pierogi. Shape into a ball, wrap tightly in plastic wrap, and let it rest at room temperature for at least 30 minutes (up to 2 hours is fine).
Step 2: Prepare the Potato-Cheese Filling
While the dough rests, place quartered potatoes in a large pot and cover with cold water by 2 inches. Add a generous pinch of kosher salt. Bring to a boil over high heat, then reduce to a steady simmer and cook for 18-22 minutes until the potatoes are completely tender — a knife should slide through with zero resistance.
Drain the potatoes thoroughly and return them to the hot pot. Let them sit for 1-2 minutes to allow residual steam to evaporate — this step removes excess moisture. Mash until completely smooth with no lumps. While the potatoes are still hot, add softened butter, farmer’s cheese, white pepper, and kosher salt. Stir vigorously until the cheese melts into the potatoes and the filling is creamy and uniform. Taste and adjust seasoning — it should be well-seasoned on its own. Set aside to cool until warm but not hot (hot filling will make the dough sticky and difficult to seal).
Step 3: Roll and Cut the Dough
Divide the rested dough in half. Work with one half at a time, keeping the other covered. On a lightly floured surface, roll the dough to about 1/8 inch thick — thin enough that you can almost see through it but not so thin that it tears. This takes patience and a steady hand.
Using a 3-inch round cutter (or the rim of a drinking glass), cut circles from the dough, placing them on a lightly floured surface. Gather the scraps, re-roll, and cut more circles until all the dough is used. You should get approximately 36-40 circles from the full batch.
Step 4: Fill and Seal the Pierogi
Place about 1 tablespoon of filling in the center of each dough circle. Dip your fingertip in water and moisten the edges of the circle. Fold the dough in half over the filling to form a half-moon shape. Press the edges together firmly, starting from one end and working to the other, pushing out any air pockets as you go. Crimp the sealed edge with the tines of a fork for a decorative seal that also ensures a tight closure.
Place finished pierogi on a lightly floured sheet pan in a single layer. Do not stack them or let them touch — they will stick together. If you need to layer, separate rows with parchment paper.
Step 5: Boil the Pierogi
Bring a large pot of generously salted water to a rolling boil. Working in batches of 8-10 (do not overcrowd), gently lower pierogi into the water. Stir once immediately to prevent sticking to the bottom. The pierogi will sink, then float to the surface after 2-3 minutes. Once they float, cook for an additional 1-2 minutes. They’re done when the dough looks slightly translucent and puffy.
Remove with a slotted spoon and transfer to a lightly oiled plate or sheet pan. Toss gently with a drizzle of oil to prevent sticking while you cook the remaining batches.
Step 6: Caramelize the Onions
While boiling the pierogi, start the onions. Heat vegetable oil and 1 tablespoon of butter in a large skillet over medium heat. Add sliced onions and a pinch of kosher salt. Cook, stirring occasionally, for 20-25 minutes until the onions are deeply golden brown and sweet, reducing to about one-third of their original volume. If they start to stick or darken too quickly, add a splash of water and reduce the heat. Transfer to a bowl and set aside.
If using bacon, cook the chopped pieces in the same skillet over medium heat for 6-8 minutes until crispy. Transfer to a paper towel-lined plate. Reserve the rendered bacon fat in the skillet.
Step 7: Pan-Fry the Pierogi
Wipe the skillet clean (or use the bacon fat as your cooking fat — it’s phenomenal). Add remaining butter over medium-high heat. When the butter foams and the foam subsides, add boiled pierogi in a single layer without crowding — work in batches of 8-10. Cook undisturbed for 2-3 minutes per side until each side is golden brown and slightly blistered. The edges should be crispy while the center stays soft and pillowy. You should hear a gentle sizzle the entire time — if it goes silent, add more butter.
Step 8: Serve
Pile the golden, pan-fried pierogi onto a warm serving platter. Top with a generous mound of caramelized onions, crispy bacon pieces if using, and dollops of sour cream. Finish with a shower of fresh chopped chives. Serve family-style, immediately, while the edges are still crackling.
Ingredient Substitutions
| Ingredient | Substitute | Notes |
|---|---|---|
| Farmer’s cheese | Ricotta (drained) or cream cheese | Ricotta should be drained overnight in cheesecloth to remove excess moisture. Cream cheese works but makes the filling richer and less tangy. Traditional twaróg is ideal if you can find it at a Polish or Eastern European market. |
| Yukon Gold potatoes | Russet potatoes | Russets are starchier and produce a fluffier mash, which some prefer. They absorb more butter, so the filling may be slightly drier — add an extra tablespoon of butter to compensate. |
| Sour cream (in dough) | Plain full-fat Greek yogurt | Yogurt adds similar richness and tenderness to the dough. Use the same amount. The flavor difference is negligible once cooked. |
| Bacon | Smoked pancetta or sautéed mushrooms | Pancetta brings similar salty, smoky notes. For a fully vegetarian version, sautéed cremini mushrooms with a splash of soy sauce add savory depth. |
| All-purpose flour | Half all-purpose, half semolina | A semolina blend makes sturdier dough that’s easier to work with, though the texture is slightly less delicate. Good for beginners. |
| White pepper | Black pepper | White pepper provides a cleaner, more subtle heat that doesn’t speckle the filling. Black pepper works fine if that’s what you have — the flavor difference is minimal. |
Chef’s Tips
- The earlobe test for dough. When the dough is properly kneaded, it should feel exactly like a human earlobe — soft, smooth, and with a gentle spring when you press it. If it feels stiff or tears easily, knead for another 2-3 minutes.
- Roll thinner than you think. Most first-time pierogi makers roll the dough too thick. At 1/8 inch, it looks alarmingly thin, but it puffs up during boiling. Thick dough means heavy, doughy pierogi that fill you up before you can enjoy the filling.
- Don’t skip the pan-fry. Boiled pierogi are traditional and perfectly fine, but the pan-fry step transforms them. The butter-crisped exterior adds a texture contrast that elevates the entire dish from comfort food to something truly special.
- Make a test pierogi. Before assembling the full batch, boil one pierogi to test. If it bursts, your seal isn’t tight enough — press harder and use more water on the edges. If the filling tastes bland, add more salt before filling the rest.
- Freeze before you fry. If making pierogi ahead, freeze them after boiling but before pan-frying. Lay boiled pierogi in a single layer on a parchment-lined sheet pan, freeze solid, then transfer to freezer bags. Pan-fry directly from frozen, adding an extra minute per side.
- Low and slow on the onions. Caramelized onions cannot be rushed. Twenty-five minutes feels like a long time, but the transformation from sharp and pungent to sweet and silky is worth every minute. Turning up the heat will brown them unevenly and leave bitter spots.
Meal Prep & Storage
- Fridge storage: Boiled pierogi keep in an airtight container in the fridge for up to 4 days. Toss them with a tiny bit of oil to prevent sticking. Pan-fry when ready to serve.
- Freezing: Pierogi freeze exceptionally well for up to 3 months. For best results, freeze them on a parchment-lined sheet pan in a single layer until solid (about 2 hours), then transfer to freezer bags. This prevents them from fusing into a pierogi brick. You can freeze them either after shaping (raw) or after boiling — both work, but post-boil freezing means less work at mealtime.
- Reheating: Pan-fry in butter over medium heat straight from the fridge or freezer. Frozen pierogi need 3-4 minutes per side, refrigerated ones need 2-3 minutes per side. Add a splash of water and cover the pan briefly if the centers feel cold.
- Batch cooking: This recipe is designed for big batches. Double it without hesitation — the effort of making pierogi is in the assembly, not the cooking. Making 80 pierogi takes only slightly longer than making 40, and you’ll be grateful to have them in the freezer on a busy Tuesday night.
Pairing Suggestions
- Drink: A cold Polish lager like Tyskie or Żywiec, crisp and clean enough to cut through the richness. For something non-alcoholic, a tart apple cider or sparkling water with lemon works beautifully.
- Side: A simple cucumber and dill salad — thinly sliced cucumbers dressed with sour cream, white vinegar, a pinch of sugar, and plenty of fresh dill. It’s the classic Polish accompaniment and the cool, bright flavor is the perfect counterpoint.
- Soup: A bowl of hot, clear beet borscht served alongside. In Poland, pierogi and borscht together is a traditional Christmas Eve combination, but it’s wonderful any time of year.
- Wildcard: A drizzle of truffle oil over the finished pierogi just before serving. It sounds fancy, but the earthy truffle flavor pairs beautifully with the potato-cheese filling and the caramelized onions.
Frequently Asked Questions
Can I make the dough in a stand mixer? Absolutely. Use the dough hook attachment on medium speed for 5-6 minutes until the dough is smooth and pulls away from the sides of the bowl. The result is identical to hand-kneading, just faster and less effort. Still let the dough rest for 30 minutes afterward — the mixer can’t shortcut gluten relaxation.
Why do my pierogi keep bursting when I boil them? This is almost always a sealing problem. Make sure you’re moistening the dough edges with water, pressing out all air pockets before sealing, and crimping firmly with a fork. Also, don’t overload the filling — 1 tablespoon is the sweet spot. Too much filling stretches the dough thin at the seal points, and the pressure from the steam inside causes a blowout.
Can I bake pierogi instead of boiling and pan-frying? You can brush them with melted butter and bake at 400F (205C) for 18-20 minutes, flipping halfway through. The texture is different — more like a baked dumpling than the traditional soft-with-crispy-edges — but it’s a good hands-off method for large batches.
What other fillings work in this dough? This dough is versatile. Classic Polish variations include sauerkraut and mushroom (kapusta z grzybami), sweet cheese with vanilla and raisins (for dessert pierogi), ground meat with onions, or fresh blueberries with sugar for summer. The dough recipe stays the same regardless of filling.
My dough keeps springing back when I roll it. What am I doing wrong? The gluten hasn’t relaxed enough. Cover the dough and let it rest for another 15-20 minutes, then try again. If it still resists, you may have added too much flour during kneading, which overdeveloped the gluten. Next time, use a lighter hand with the flour and err on the side of a slightly stickier dough.
How many pierogi per person for a main course? In Poland, the answer is “as many as you can eat.” For practical purposes, plan on 8-10 pierogi per person as a main course, or 5-6 as a starter. This recipe yields approximately 36-40 pierogi, which generously feeds 4-6 people depending on appetites and accompaniments.